How to Build Python OpenCV with CUDA Support — Azure Virtual Machine with GPU
We can not use CUDA support while we install the base Python OpenCV package. To do that, we should rebuild OpenCV package with CUDA support options. I want to summarize that and create documentation for it to understand easily.
Ubuntu — Azure Virtual Machine Connection and Settings
ssh -i ~/.ssh/id_rsa.pem username@ip_address
sudo su
Then,
apt-get update
apt install cmake cmake-data build-essential
In addition, we should be sure which OpenCV is suitable for our system and specify which CUDA dependencies should be installed.
- There is a guide I prepared before to start to install the required CUDA dependencies ->
Let’s check your CUDA versions on your system like below
#To check your own system CUDA versions
nvidia-smi
nvcc --version
In addition, gcc and g++ versions are so important to avoid get errors. I had seen several bugs during my OpenCV build process. I have created optimum settings for my system, you can try these ones if you wish. If you have get any problems, you may have to change versions.
sudo apt install gcc-10 g++-10
export CC=/usr/bin/gcc-10
export CXX=/usr/bin/g++-10
This line provides to know which versions are currently used. You should select the right one before the build stage.
sudo update-alternatives --config g++
#and
sudo update-alternatives --config gcc
You can choose with arrow keys and then update the settings.
After, clone OpenCV Contrib and OpenCV GitHub repo like below.
mkdir opencv_gpu
cd opencv_gpu
git clone https://github.com/opencv/opencv.git
git clone https://github.com/opencv/opencv_contrib.git
cd opencv
mkdir build
The cmake commands that described below contains OpenCV GPU CUDA support dependencies. You should try with correct locations which belong to your system path. I have Python 3.10 version, however, if you have different version of Python please change relevant lines on your own. Please do not create “virtualenv” for this stage, I got error while I used that, so I have found solution using with base Python3 on Ubuntu. — you may use conda virtual env, I am not sure.
PYTHON3_EXECUTABLE=$(which python3)
PYTHON3_INCLUDE_DIR=$(python3 -c "import sysconfig; print(sysconfig.get_path('include'))")
PYTHON3_PACKAGES_PATH=$(python3 -c "import sysconfig; print(sysconfig.get_path('platlib'))")
PYTHON3_LIBRARY=$(python3 -c "import sysconfig; print(sysconfig.get_config_var('LIBDIR'))")/libpython3.10.so
cmake -D CMAKE_BUILD_TYPE=RELEASE \
-D CMAKE_INSTALL_PREFIX=/usr/local \
-D INSTALL_C_EXAMPLES=OFF \
-D INSTALL_PYTHON_EXAMPLES=OFF \
-D WITH_TBB=ON \
-D WITH_CUDA=ON \
-D ENABLE_FAST_MATH=ON \
-D CUDA_FAST_MATH=ON \
-D WITH_CUBLAS=ON \
-D BUILD_opencv_java=OFF \
-D BUILD_ZLIB=ON \
-D BUILD_TIFF=ON \
-D WITH_GTK=ON \
-D WITH_FFMPEG=ON \
-D WITH_1394=ON \
-D BUILD_PROTOBUF=ON \
-D OPENCV_GENERATE_PKGCONFIG=ON \
-D OPENCV_PC_FILE_NAME=opencv4.pc \
-D OPENCV_ENABLE_NONFREE=OFF \
-D WITH_GSTREAMER=ON \
-D WITH_V4L=ON \
-D WITH_QT=ON \
-D WITH_CUDNN=ON \
-D OPENCV_EXTRA_MODULES_PATH=../../opencv_contrib/modules \
-D BUILD_EXAMPLES=ON \
-D PYTHON3_EXECUTABLE=$PYTHON3_EXECUTABLE \
-D PYTHON3_INCLUDE_DIR=$PYTHON3_INCLUDE_DIR \
-D PYTHON3_PACKAGES_PATH=$PYTHON3_PACKAGES_PATH \
-D PYTHON3_LIBRARY=$PYTHON3_LIBRARY ..OPENCV_EXTRA_MODULES_PATH : OpenCV Contrib “/modules” path that you cloned from GitHub
PYTHON3_EXECUTABLE , PYTHON3_INCLUDE_DIR, PYTHON3_PACKAGES_PATH, PYTHON3_LIBRARY : If you don’t use base python3, update these regarding to your used Python.
This stage may took some time. After the finish, your “/build” path look like this :

Process that is described below may took 15–20 minutes.
make -j$(nproc)To install GPU-supported OpenCV build.
sudo make installIn order to test whether CUDA package enabled or disabled
python3
>>> import cv2
>>> print(cv2.cuda.getCudaEnabledDeviceCount())
#1
In order to see compiling settings via:
python -c "import cv2; print(cv2.getBuildInformation())"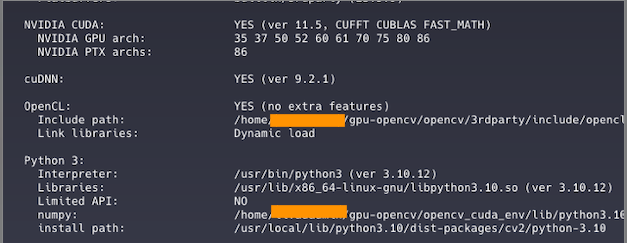
You should saw your CUDA and cuDNN settings output like above.
Troubleshooting and Other Steps
I have included solutions for some parts of the bugs that I had during the build stage.
- If you get any error during your build step, do not forget to remove CmakeChache.txt file, it has to be removed otherwise you will get error.
rm ../CMakeCache.txt- If you get NVIDIA CUDA bugs or errors, it is probably caused driver version conflicts. You can re-install CUDA Toolkit or change version of gcc and g++.
- You have to be sure whether selected correct gcc and g++ versions before start to build. Otherwise, it might cause conflicts as I’ve had before.
sudo update-alternatives --config gcc
sudo update-alternatives --config g++- Python version and environment is your choice, I used ubuntu based Python 3.10 and did not create any virtual environment.
- There might be useful to see your CUDA compute capability info like below. It can help to select your correct CUDA version.
nvidia-smi --query-gpu=compute_cap --format=csv